
Citrix – NetScaler VPN Portal Homepage – Storefront Refused Connection with X1 Theme

Summary

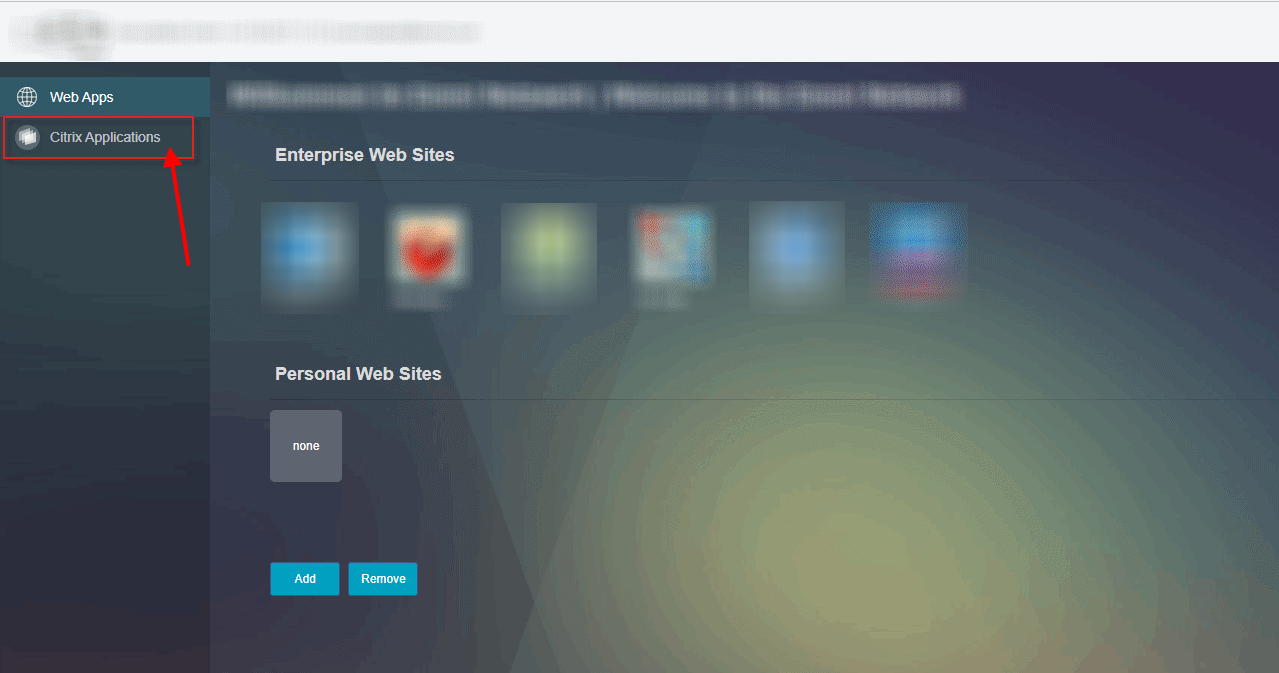
Your company uses SSL VPN via Citrix NetScaler to provide secure access for employees and customers. When users connect, they are presented with the VPN portal homepage, styled with the X1 theme.

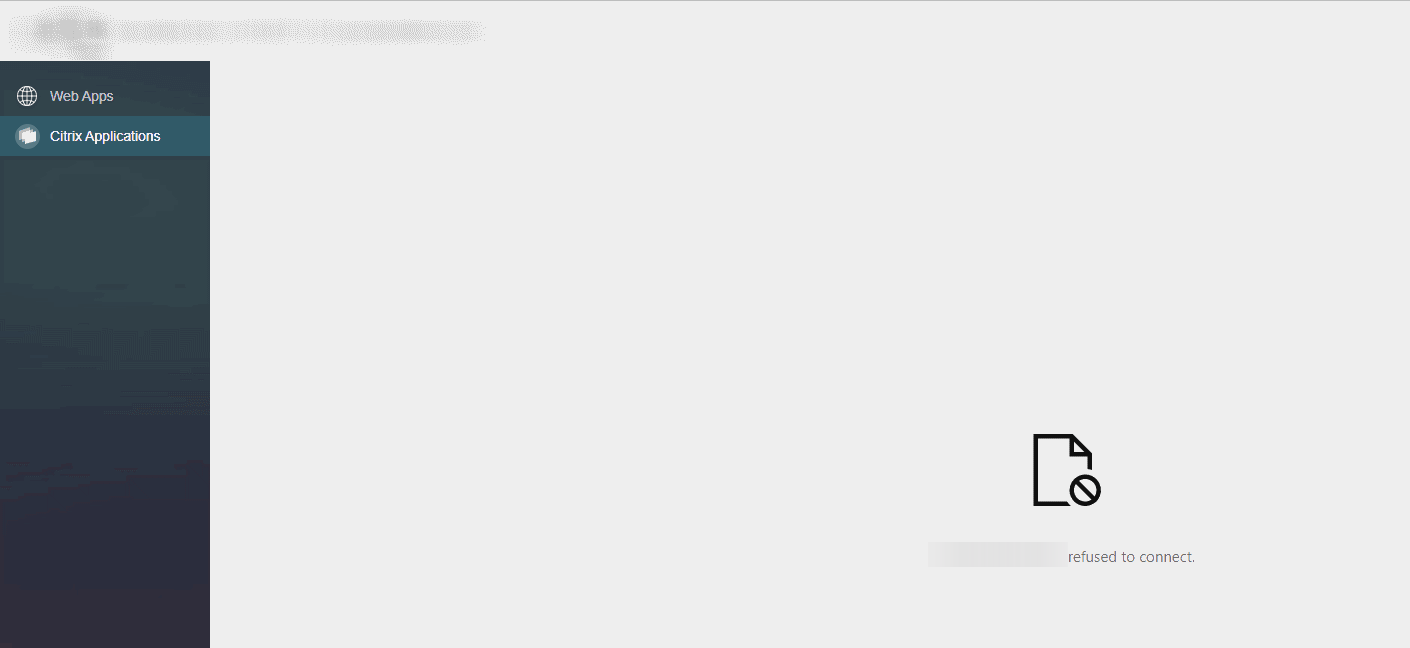
From the portal menu, clicking the “Citrix Applications” link is intended to open the Citrix Receiver page, as defined in the session profile. However, when using Microsoft Edge (Chromium-based), the Citrix Receiver page fails to load or is refused.

Description

When accessing Citrix StoreFront through the Citrix NetScaler VPN portal homepage (configured with the X1 theme), the X-Frame-Options settings in StoreFront may block the HTTP request from the Microsoft Edge (Chromium)browser.

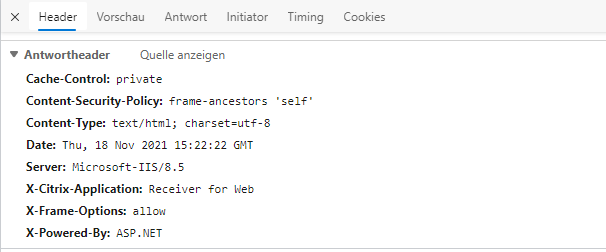
Even if you’ve followed the guidance in Citrix article CTX202890, the frame-ancestors directive provided in the article does not fully resolve the issue when used with Microsoft Edge Chromium in combination with the X1 theme.

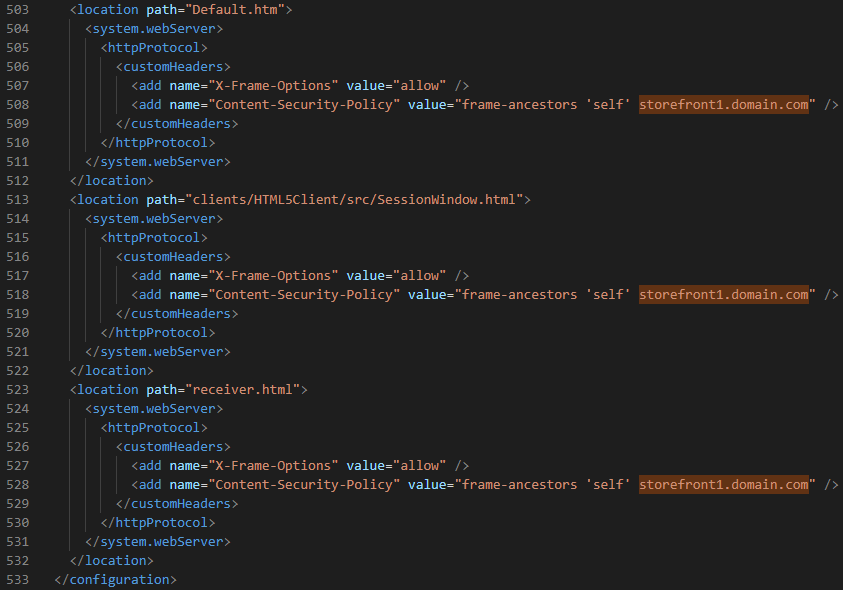
To fix this, you need to supplement the frame-ancestors directive with the FQDN of the StoreFront server, or include the domain and top-level domain of your internal environment.
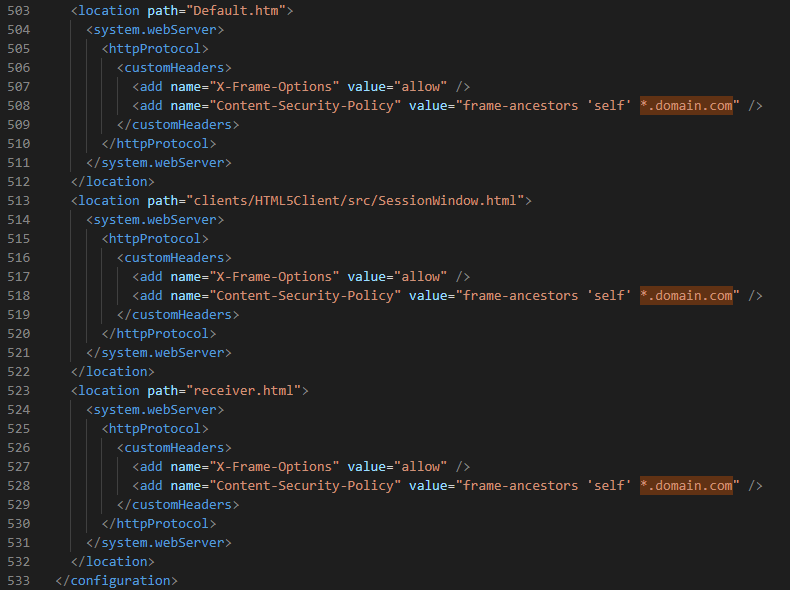
Using wildcards in the frame-ancestors value is also supported and, in most cases, provides the simplest and most flexible solution—without compromising the security of IIS or Edge.

To verify the issue, you can use the Developer Tools in Microsoft Edge Chromium to inspect the HTTP response and view the specific refused request error.

Configuring the

1
web.config

File in Citrix StoreFront

To resolve the frame blocking issue, open the web.config file for the affected StoreFront Web Store located at:
C:\inetpub\wwwroot\Citrix\StoreWeb\web.config

Search for the X-Frame-Options or Content-Security-Policy directive.

    1. Locate the frame-ancestors setting.
    2. Add your StoreFront FQDN or your top-level domain to the
    3. frame-ancestors value, as shown in the example or screenshot.

Example:
Content-Security-Policy: frame-ancestors ‘self’ https://storefront.yourdomain.com

You can also use wildcards for flexibility, depending on your environment and security requirements.

This configuration ensures proper loading of the StoreFront page within the Citrix NetScaler VPN portal—especially when using the X1 theme and Microsoft Edge Chromium.

frame-ancestors with Storefront FQDN configuration in the X-Frame-Options
frame-ancestors with wildcard domain and top level configuration in the X-Frame-Options
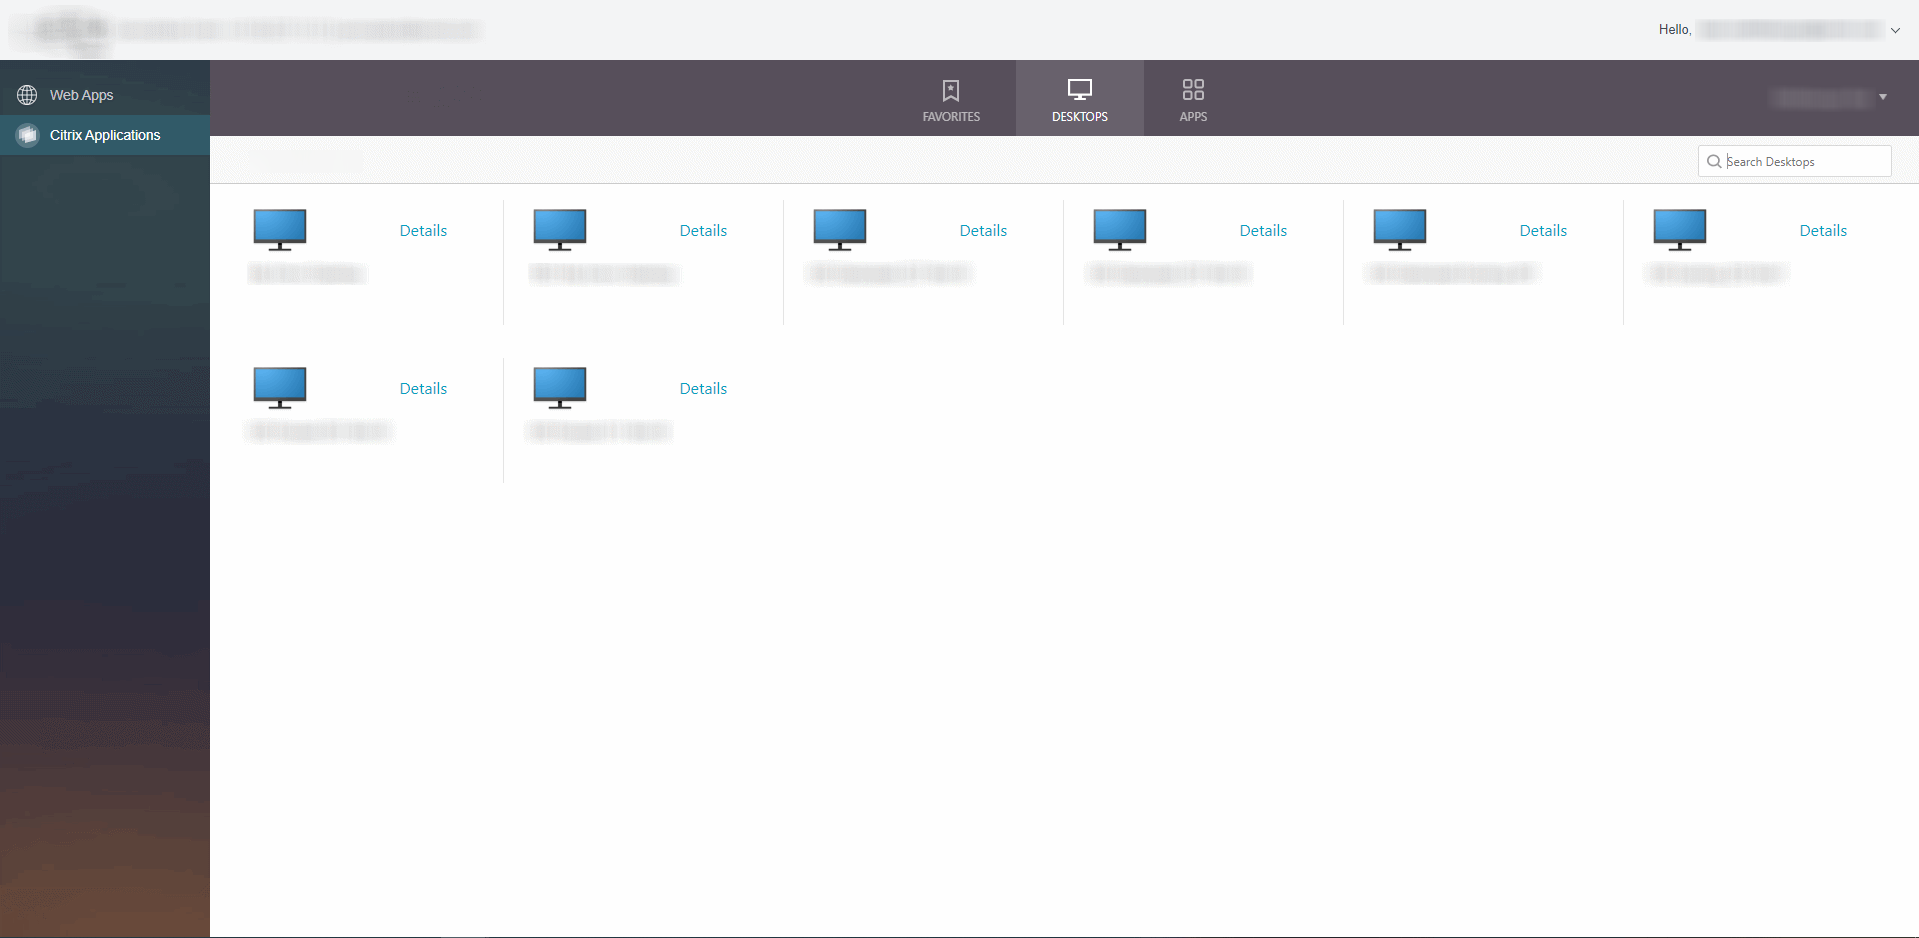
With the configured frame-ancestors in the X-Frame-Options, the Storefront Receiver page will be no longer refused.
Citrix – Microsoft Edge Chromium Prompt To Run nglauncher.exe (Citrix NetScaler Plugin)

Summary

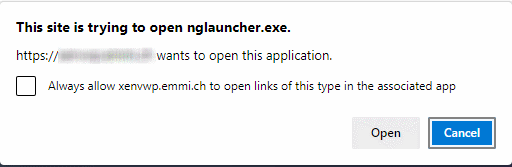
When logging in to Citrix NetScaler Gateway with Citrix VPN configured, Microsoft Edge prompts the user to run nglauncher.exe (Citrix NetScaler Plugin).
The following instructions provide a solution to properly configure Microsoft Edge Chromium to handle this prompt.

Description

To identify the required configuration values, you need to analyze the communication between Microsoft Edge Chromium and the Citrix NetScaler Gateway. In this example, the analysis was performed using Microsoft Edge Developer Tools.

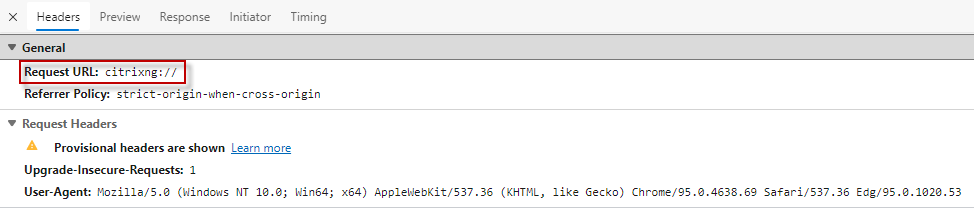
During login, you can observe the nglauncher.exe call in the HTTP request headers of the Citrix NetScaler page.
The “Request URL:” field contains the key information needed for the configuration steps that follow.

You can apply this configuration either:

    • Globally via Group Policy (using the Microsoft Edge Chromium ADMX templates), or
    • Locally by modifying the Windows Registry on the user’s device.

GPO Configuration

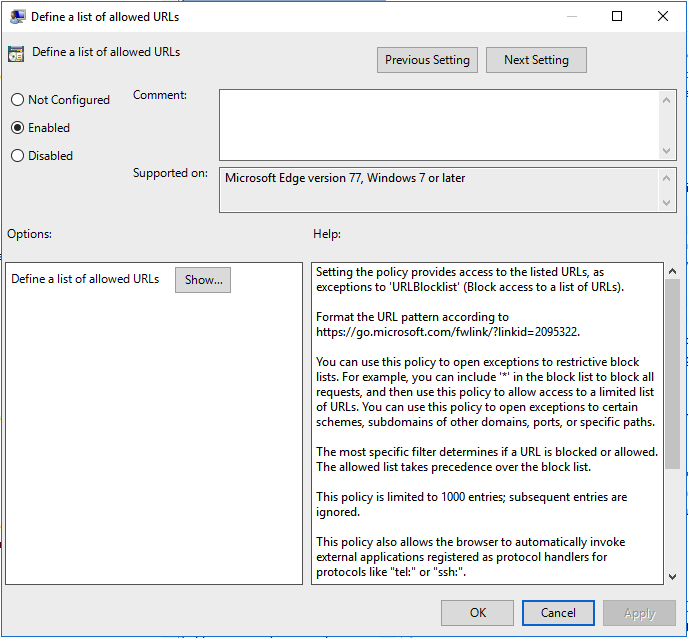
The following Group Policy setting must be configured to suppress the Microsoft Edge Chromium prompt.

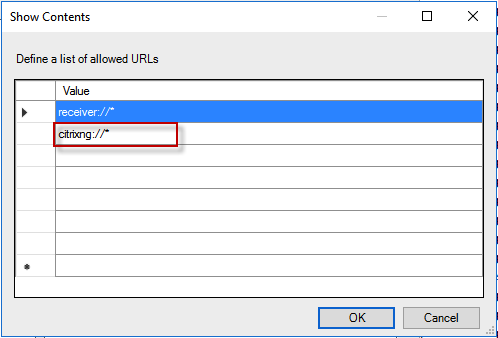
GPO Setting: Define a list of allowed URLs
GPO Setting Path: User Configuration\Policies\Administrative Templates\Microsoft Edge\
Value:citrixng://*


Registry Configuration

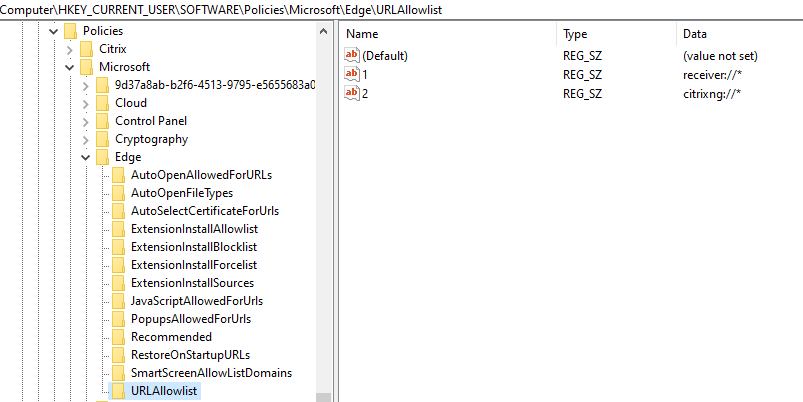
The following registry setting must be applied to bypass the Microsoft Edge Chromium prompt.

Registry Hive: HKEY_LOCAL_MACHINE or HKEY_CURRENT_USER
Registry Path: Software\Policies\Microsoft\Edge\URLAllowlist
Registry Value Name: {number} **
Registry Value Type: REG_SZ
Registry Value: citrixng://*

** The Value consists of a number, if an value already exists, the entry to be configured must have a sequence number.


Citrix – Backup Netscaler MPX/VPX/SDX appliance with powershell

Summary

You or your company operate a Citrix Netscaler MPX/VPX/SDX appliance and need a backup?

Here is a method with a PowerShell script to backup your Citrix Netscaler appliance regardless of the version and appliance platforms.

Description and configurations steps

The script running in my scenario on central scripting server in the data center, triggered by a scheduled task. Following steps are necessary to run the PowerShell script automatically over a scheduled task.

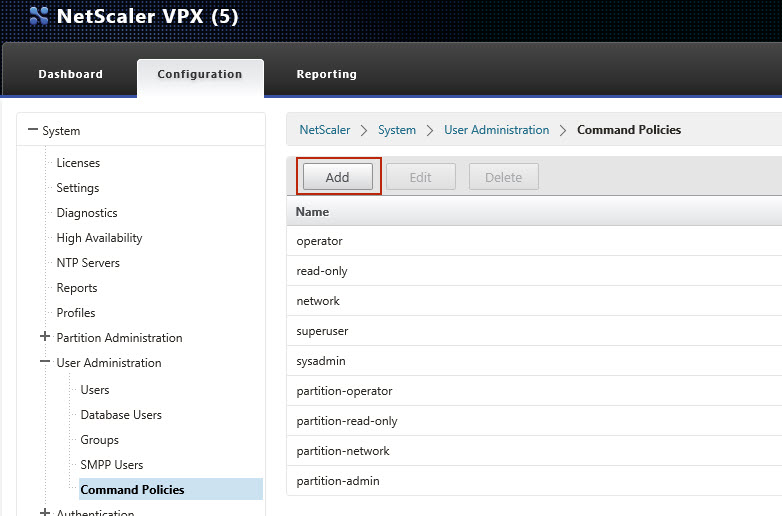
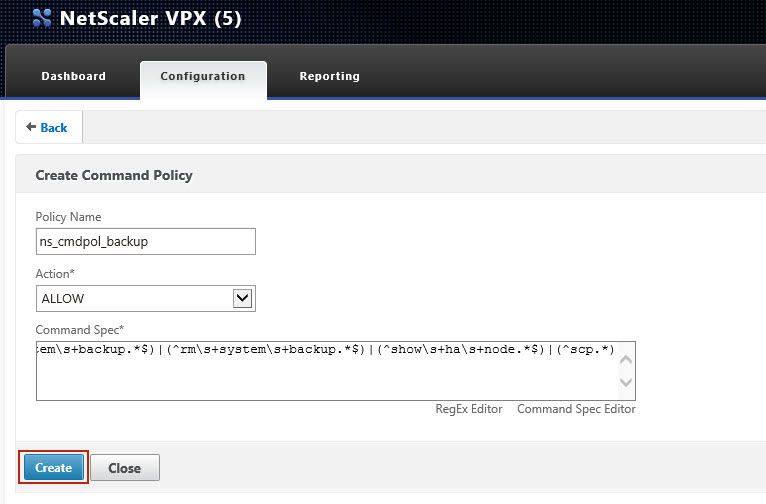
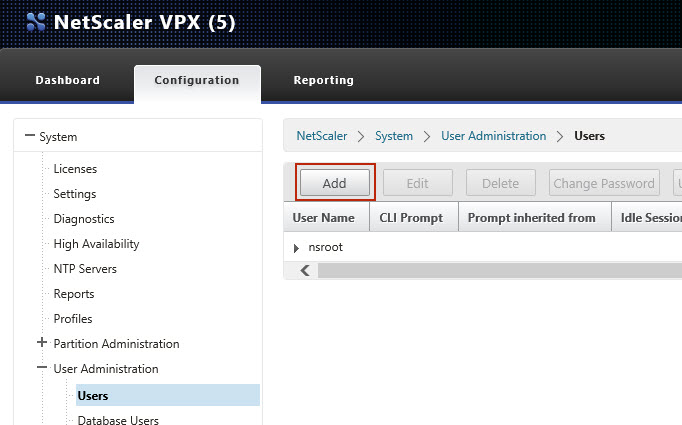
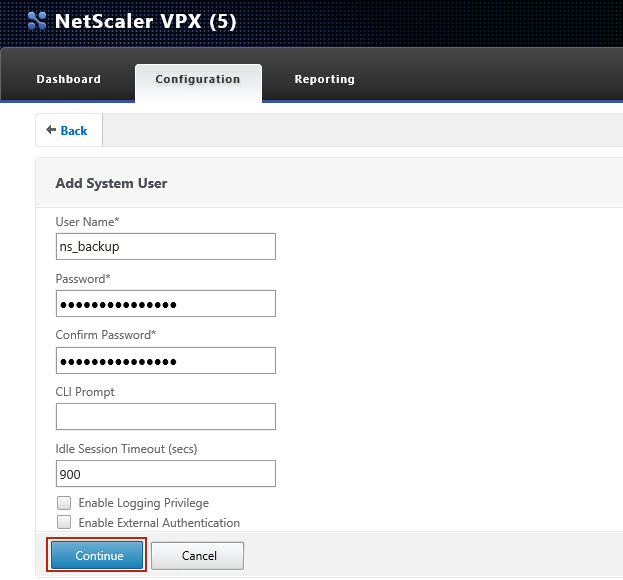
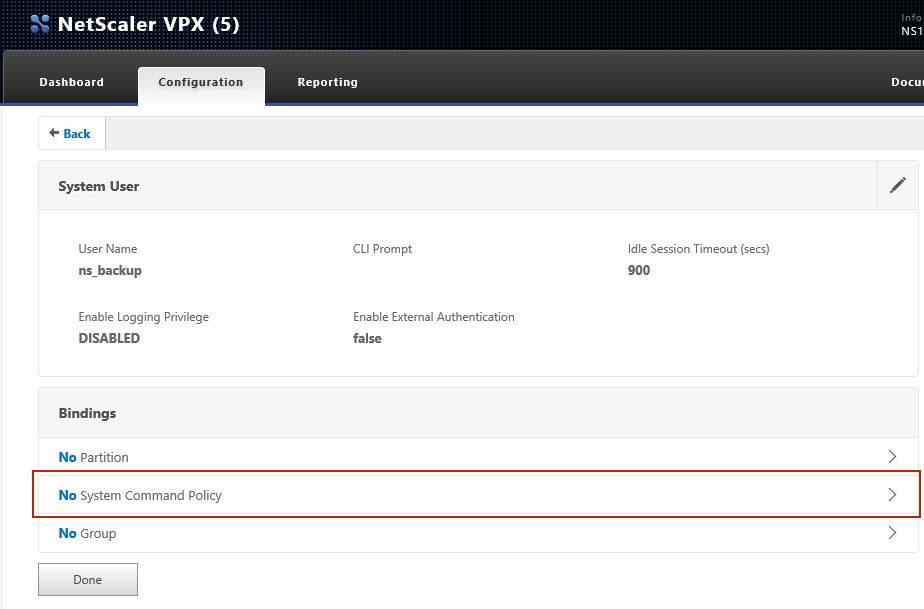
  1. Create a command policy and backup user on your Citrix Netscaler appliance with restricted permissions, to run the PowerShell script from outside the Citrix Netscaler appliance.
  2. Open firewall ports between the server that run the PowerShell script and your Citrix Netscaler appliance.
  3. Save the files to your script server (show prerequisites)
  4. Run the PowerShell script through an scheduled task

Script variables

First you musst declare some variables and values to understand and use the following PowerShell script.

  • Parameters from scheduled task command line variables (script line 13 – 19) $appliancename and $backupuser (In my scenario, the scheduled task can be run with variables in the command lines section, the appliance name and backup user name are defined by the variables.)
  • The location of the script and temporary files (script line 28) $backuproot
  • The location where the backup files will be saved (script line 29) $backupfolder
  • The name of the compressed backup file (script line 30) $backupname
  • $decodedDATA are the password for the backup user on the Citrix Netscaler appliance (in my environment I have saved the password in a Base 64 file)

Prerequisites

The following applications should be available on the windows server that run the PowerShell script.

  • 7-Zip or something similar
  • PSCP (pscp.exe) from Putty source
  • PLink (plink.exe) from Putty source

1 Create a command policy and backup user on your Citrix Netscaler appliance

Command Policy Regex:
(^create\s+system\s+backup.*$)|(^rm\s+system\s+backup.*$)|(^show\s+ha\s+node.*$)|(^scp.*)

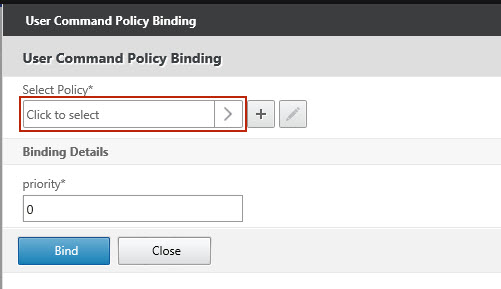
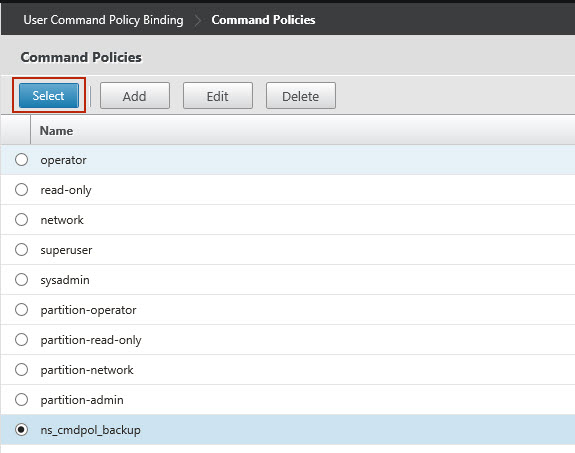
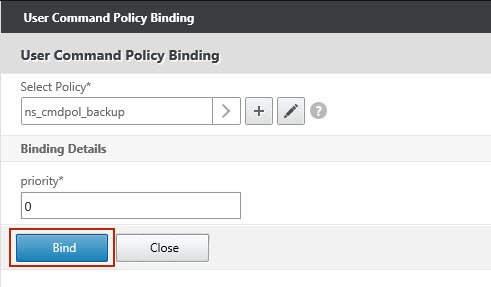
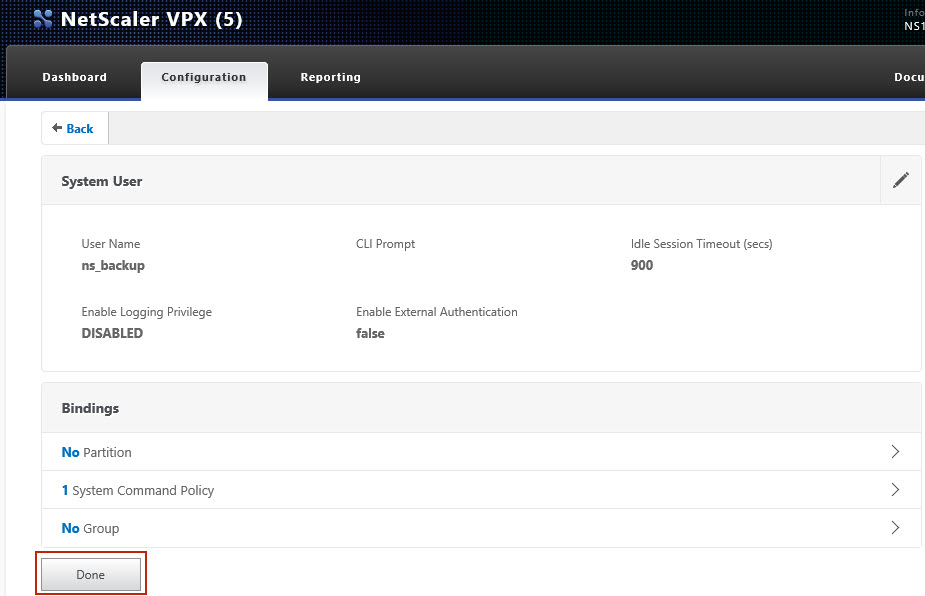
Create a backup user on your Citrix Netscaler appliance, with following settings.
 

2 Open firewall ports between the server that run the PowerShell script and your Citrix Netscaler appliance

Open on your firewall between the script server and the Citrix Netscaler the TCP Port 22 (SSH).

3 Save the files to your script server

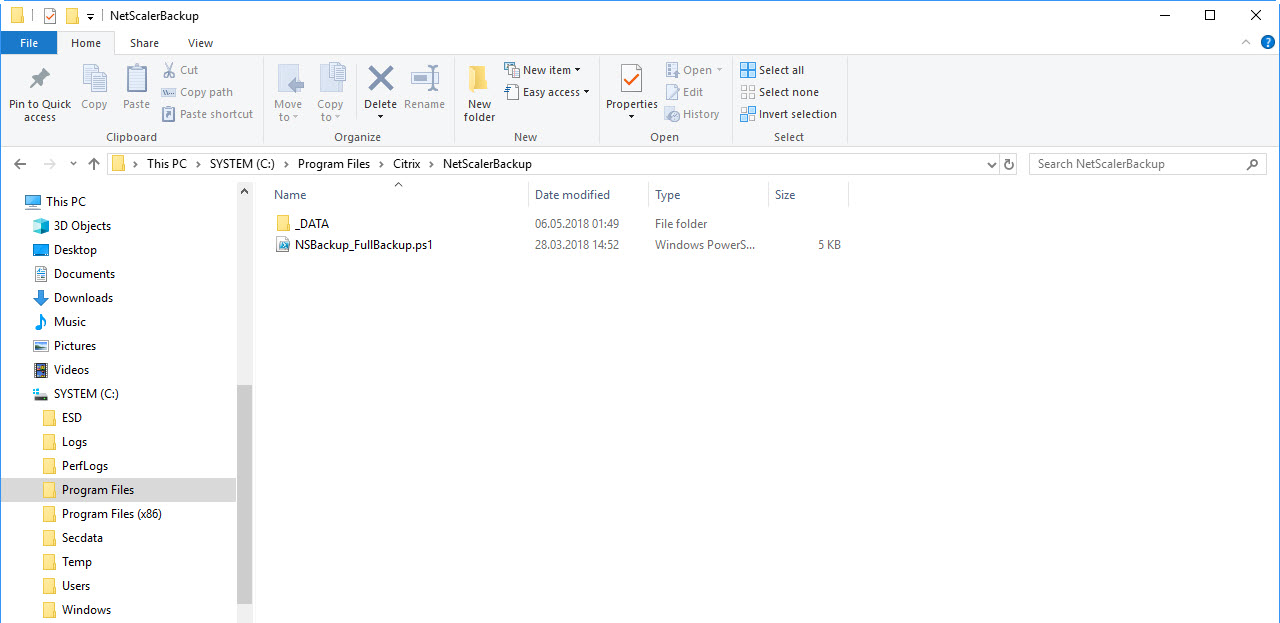
Backup root folder “C:\Program Files\Citrix\NetScalerBackup”. Save the powershell script in this folder, or to the path you like.

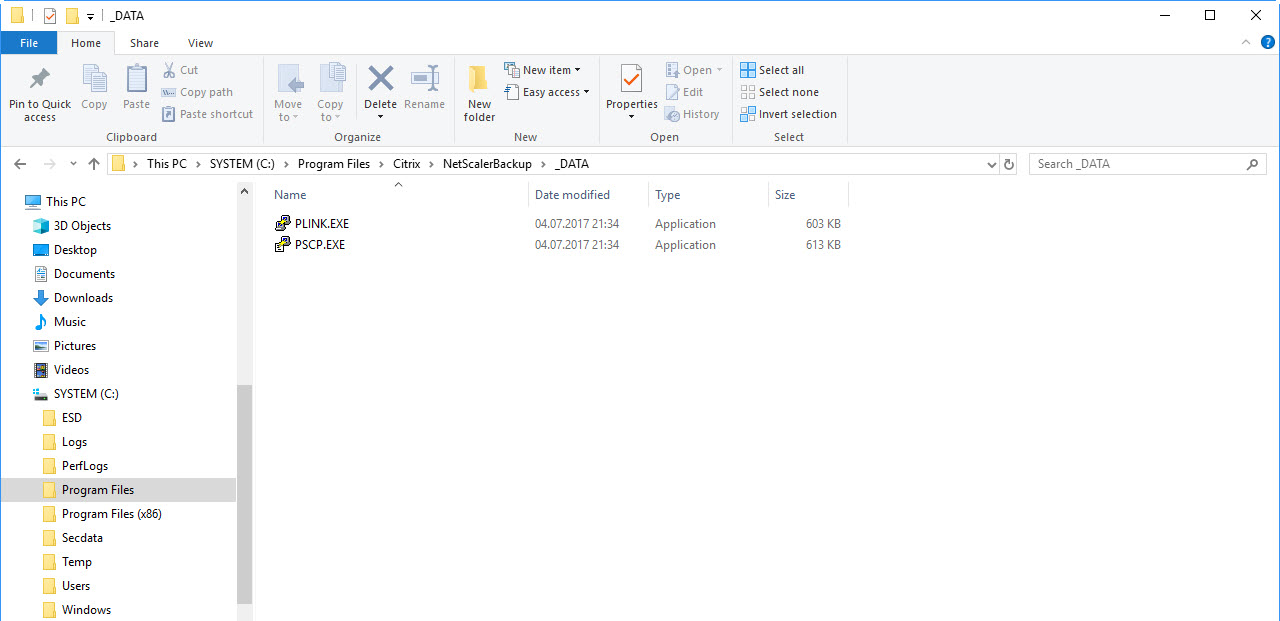
Backup program path “C:\Program Files\Citrix\NetScalerBackup\_DATA” Save the PLINK.exe ans PSCP.exe from the Putty source in this folder.

4 Run the PowerShell script through a scheduled task

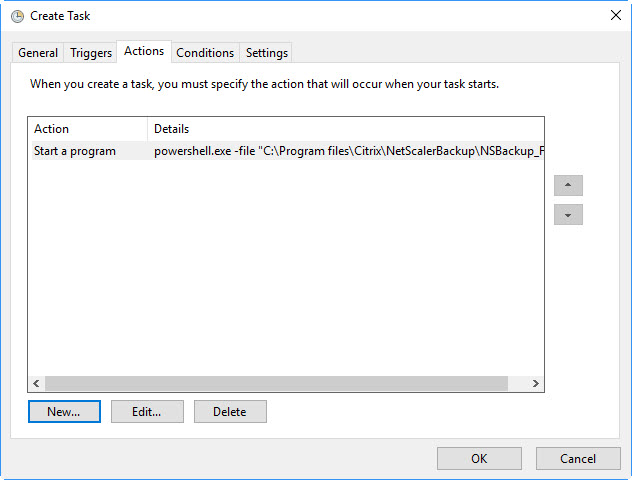
To run the PowerShell script with a scheduled task, create an action with following command line parameters:

powershell.exe -file “C:\Program files\Citrix\NetScalerBackup\NSBackup_FullBackup.ps1” -appliancename nsvpx01.wdho.nt -backupuser ns_backup

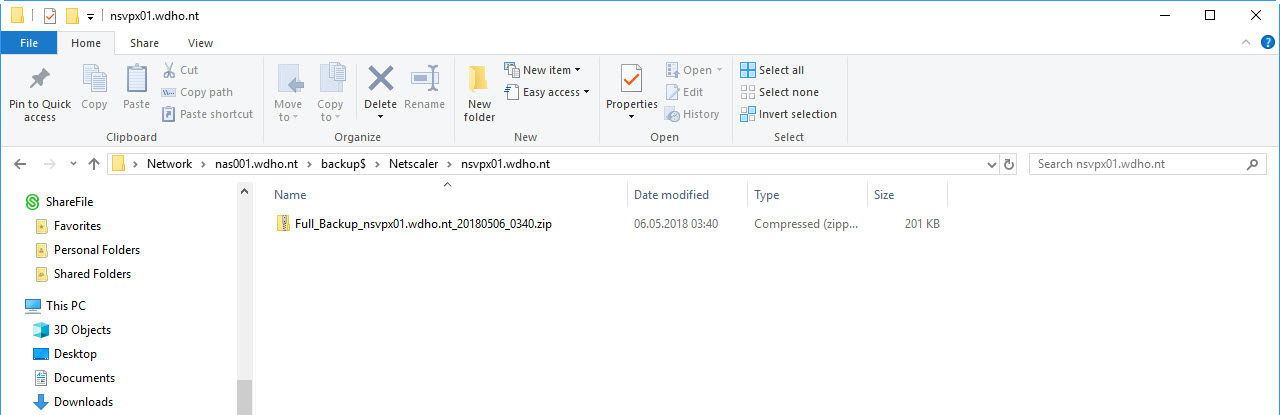
The PowerShell script copy the compressed Full Backup to the destination folder.

The PowerShell script

The script create a full backup of your Citrix Netscaler appliance, compress the backup data and copy the compressed file to a CIFS share, or file location you specified in the PowerShell script.After the backup was created and copied, the PowerShell script delete the backup on the Citrix Netscaler appliance. When you have an HA pair of Citrix Netscaler, the PowerShell script also delete the backup on the HA secondary member (The HA sync service in the primary node, copy the backup to the secondary node).

Lines: 103

1
2
3
4
5
6
7
8
9
10
11
12
13
14
15
16
17
18
19
20
21
22
23
24
25
26
27
28
29
30
31
32
33
34
35
36
37
38
39
40
41
42
43
44
45
46
47
48
49
50
51
52
53
54
55
56
57
58
59
60
61
62
63
64
65
66
67
68
69
70
71
72
73
74
75
76
77
78
79
80
81
82
83
84
85
86
87
88
89
90
91
92
93
94
95
96
97
98
99
100
101
102
103
####################################################################################
#  Title:       FullBackup from Citrix NetScaler Appliance
#  Description: Create FullBackup from Citrix NetScaler Appliance and copy to CIFS
#               Backup Share
#  Version:     2.1/roe
#  Date/Time:   28.03.2018 / 08:03
#  Developer:   Beat Röthlisberger
####################################################################################

#----------------------------------------------
# Collect parameters from start command line
#----------------------------------------------
Param( [Parameter(Mandatory=$True,Position=1)]
[string]$appliancename,
[Parameter(Mandatory=$True)]
[string]$backupuser,
[switch]$force = $false
)

#----------------------------------------------
# Collect date and time
#----------------------------------------------
$actualdatetime = Get-Date -UFormat "%Y%m%d_%H%M"

#**********************************************
# Set variables
#**********************************************
$backuproot = "C:\Program Files\Citrix\NetScalerBackup"
$backupfolder ="\\nas001.wdho.nt\backup$\Netscaler\$appliancename"
$backupname = "Full_Backup_" + $appliancename + "_" + $actualdatetime
#**********************************************

#----------------------------------------------
# Script variables
#----------------------------------------------
$bakupprgpath = "$backuproot\_DATA"
$pscppath = "$bakupprgpath\pscp.exe"
$plinkpath = "$bakupprgpath\plink.exe"
$appliancepath = $appliancename + ':/var/ns_sys_backup'
$baseDATA = "$bakupprgpath\baseDATA.txt"
$readbaseDATA = [IO.File]::ReadAllText($baseDATA)
$decodeDATA = [System.Text.Encoding]::Unicode.GetString([System.Convert]::FromBase64String($ReadBaseDATA))
$zippath = "C:\Program Files\7-Zip\7z.exe"
$backupnametgz = $backupname + '.tgz'
$backupnamezip = "$backupname.zip"

#----------------------------------------------
# Run backup on NetScaler appliance
#----------------------------------------------
&$plinkpath -l $backupuser -pw $decodeDATA -ssh $appliancename create system backup $backupname -level full -comment FullBackup_Script

#----------------------------------------------
# Copy backup file from NetScaler appliance
#----------------------------------------------
&$pscppath -r -scp -l $backupuser -pw $decodeDATA $appliancepath $backuproot\$backupname

#----------------------------------------------
# Compress backup and copy to backup cifs share
#----------------------------------------------
&$zippath a "$backupfolder\$backupnamezip" "$backuproot\$backupname"
Remove-Item "$backuproot\$backupname" -recurse

#----------------------------------------------
# Delete backup on netscaler appliance
#----------------------------------------------
&$plinkpath -l $backupuser -pw $decodeDATA -ssh $appliancename rm system backup $backupnametgz

#----------------------------------------------
# Find secondary HA NetScaler appliance and
# delete synced backup on secondary HA node
#----------------------------------------------
$nshaidsec = &$plinkpath -l $backupuser -pw $decodeDATA -ssh $appliancename "show HA node | grep -E 'ID:' -i | grep -v '0'"
$separator = "Done","2)","Node ID:"
$option = [System.StringSplitOptions]::RemoveEmptyEntries
$nshaidsec2,$nshaidsec1,$nshaidsec = $nshaidsec.Split($separator, $option)
$nshaidsec = $nshaidsec.Trim()
#Write-Host "Secondary Node ID:" $nshaidsec

$nshastatesec = &$plinkpath -l $backupuser -pw $decodeDATA -ssh $appliancename "show HA node $nshaidsec | grep -E 'Master State:' -i"
$separator = "Done","2)","Master State:"
$option = [System.StringSplitOptions]::RemoveEmptyEntries
$nshastatesec2,$nshastatesec1,$nshastatesec = $nshastatesec.Split($separator, $option)
$nshastatesec = $nshastatesec.Trim()
#Write-Host "Secondary HA State:" $nshastatesec

$nsipsec = &$plinkpath -l $backupuser -pw $decodeDATA -ssh $appliancename "show HA node $nshaidsec | grep -E 'IP:' -i"
$separator = "Done","2)","IP:"
$option = [System.StringSplitOptions]::RemoveEmptyEntries
$nsipsec2,$nsipsec1,$nsipsec = $nsipsec.Split($separator, $option)
$nsipsec = $nsipsec.Trim()
#Write-Host "Secondary IP:" $nsipsec

$appliancenamesec = [System.Net.Dns]::GetHostByAddress($nsipsec).Hostname
#Write-Host "Secondary Hostname:" $appliancenamesec

If ($nshastatesec -like 'Secondary'){
#Write-Host "Delete Backup on secondary node..."
&$plinkpath -l $backupuser -pw $decodeDATA -ssh $appliancenamesec rm system backup $backupnametgz
}

#----------------------------------------------
# End
#----------------------------------------------