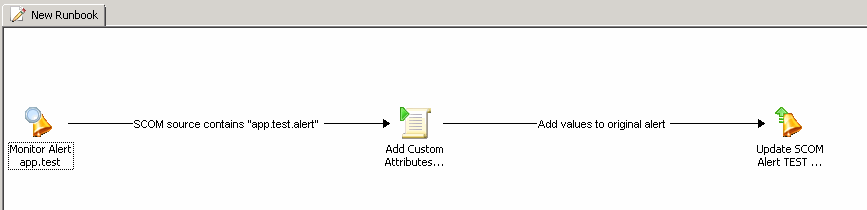
Citrix – Backup Netscaler MPX/VPX/SDX appliance with powershell

Summary

You or your company operate a Citrix Netscaler MPX/VPX/SDX appliance and need a backup?

Here is a method with a PowerShell script to backup your Citrix Netscaler appliance regardless of the version and appliance platforms.

Description and configurations steps

The script running in my scenario on central scripting server in the data center, triggered by a scheduled task. Following steps are necessary to run the PowerShell script automatically over a scheduled task.

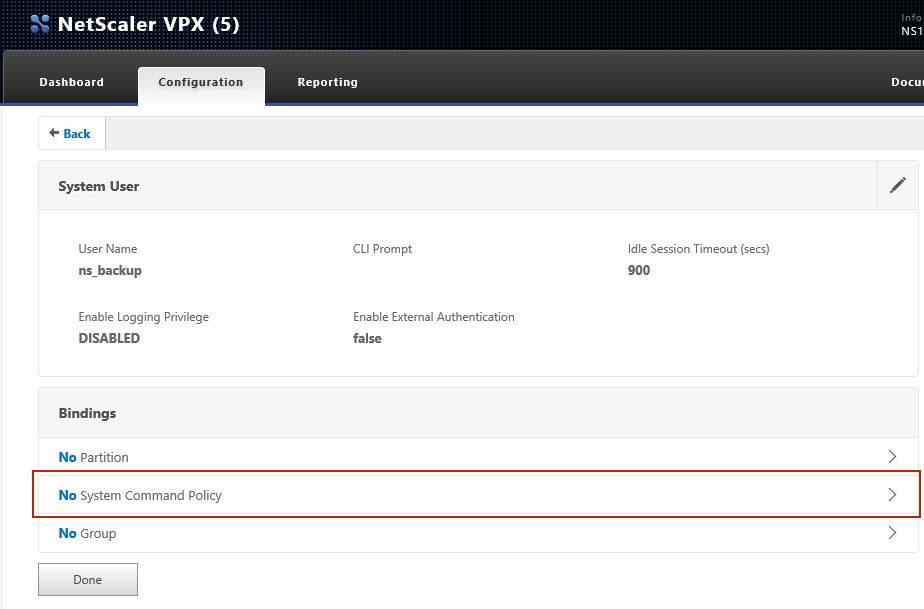
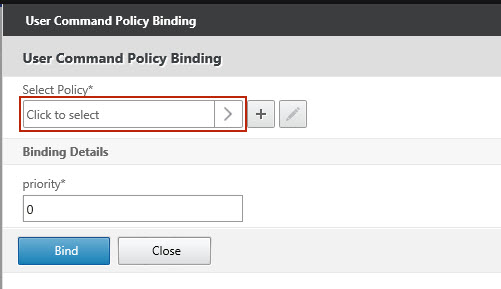
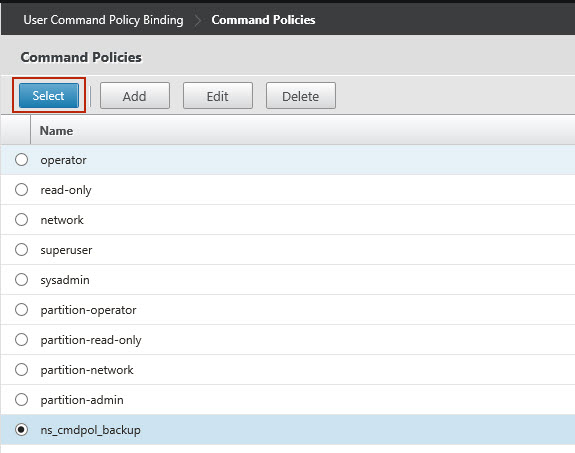
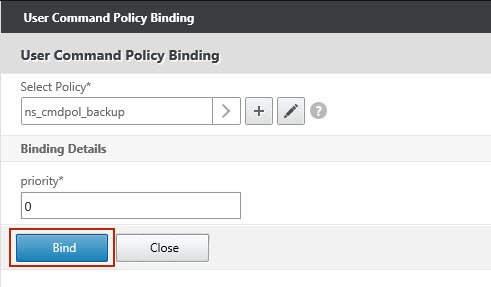
  1. Create a command policy and backup user on your Citrix Netscaler appliance with restricted permissions, to run the PowerShell script from outside the Citrix Netscaler appliance.
  2. Open firewall ports between the server that run the PowerShell script and your Citrix Netscaler appliance.
  3. Save the files to your script server (show prerequisites)
  4. Run the PowerShell script through an scheduled task
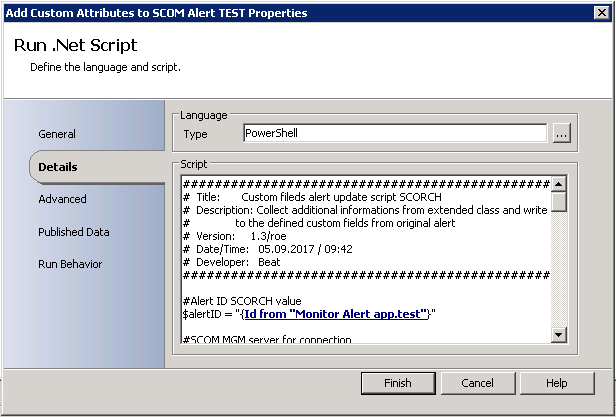
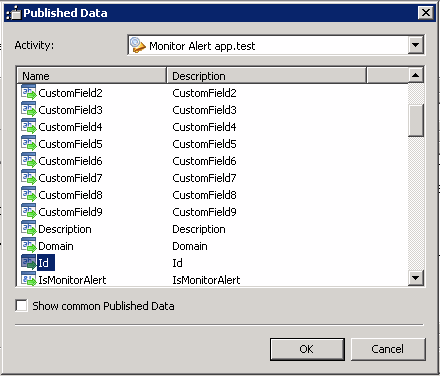
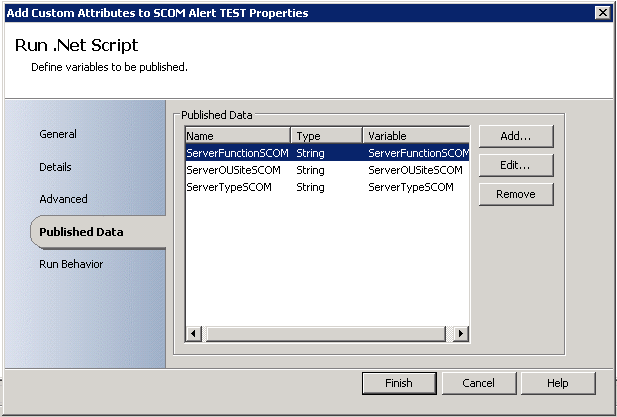
Script variables

First you musst declare some variables and values to understand and use the following PowerShell script.

  • Parameters from scheduled task command line variables (script line 13 – 19) $appliancename and $backupuser (In my scenario, the scheduled task can be run with variables in the command lines section, the appliance name and backup user name are defined by the variables.)
  • The location of the script and temporary files (script line 28) $backuproot
  • The location where the backup files will be saved (script line 29) $backupfolder
  • The name of the compressed backup file (script line 30) $backupname
  • $decodedDATA are the password for the backup user on the Citrix Netscaler appliance (in my environment I have saved the password in a Base 64 file)

Prerequisites

The following applications should be available on the windows server that run the PowerShell script.

  • 7-Zip or something similar
  • PSCP (pscp.exe) from Putty source
  • PLink (plink.exe) from Putty source

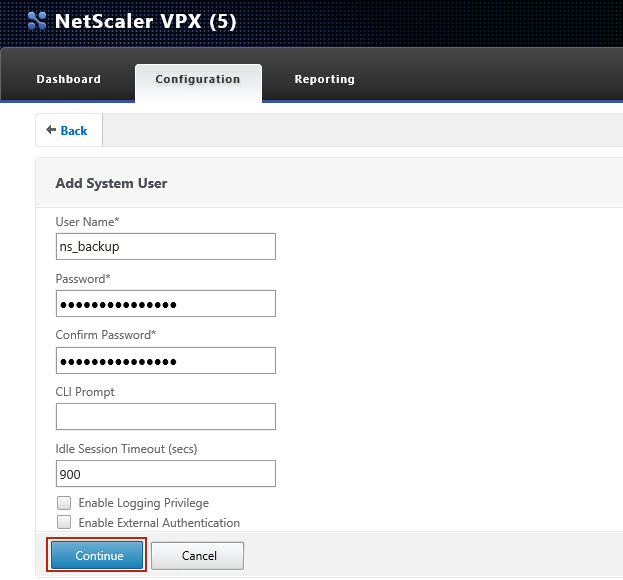
1 Create a command policy and backup user on your Citrix Netscaler appliance

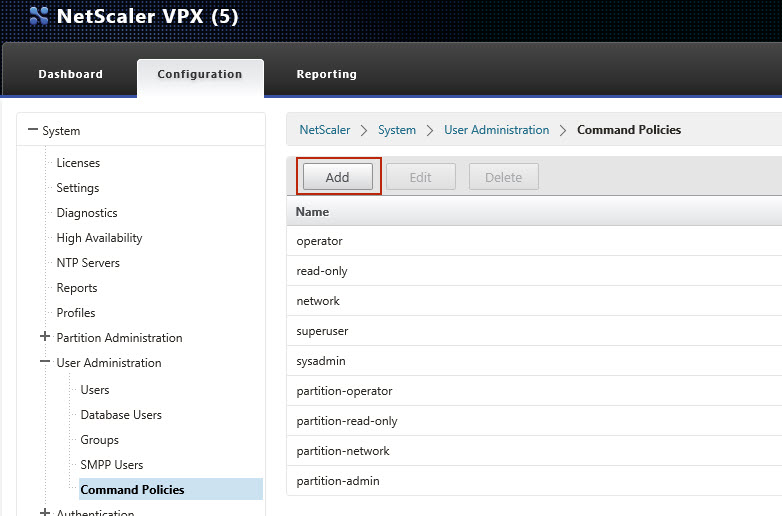
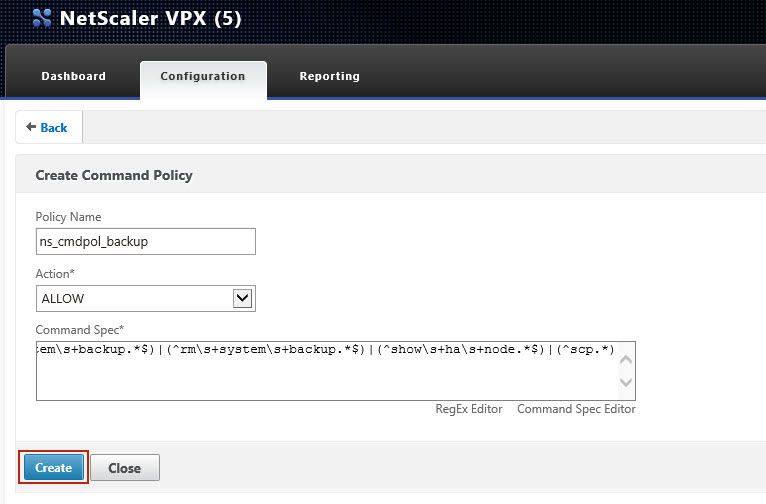
Command Policy Regex:
(^create\s+system\s+backup.*$)|(^rm\s+system\s+backup.*$)|(^show\s+ha\s+node.*$)|(^scp.*)

Create a backup user on your Citrix Netscaler appliance, with following settings.
 

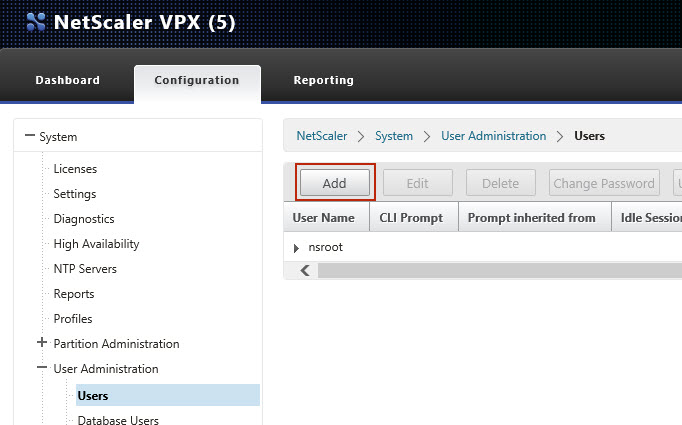
2 Open firewall ports between the server that run the PowerShell script and your Citrix Netscaler appliance

Open on your firewall between the script server and the Citrix Netscaler the TCP Port 22 (SSH).

3 Save the files to your script server

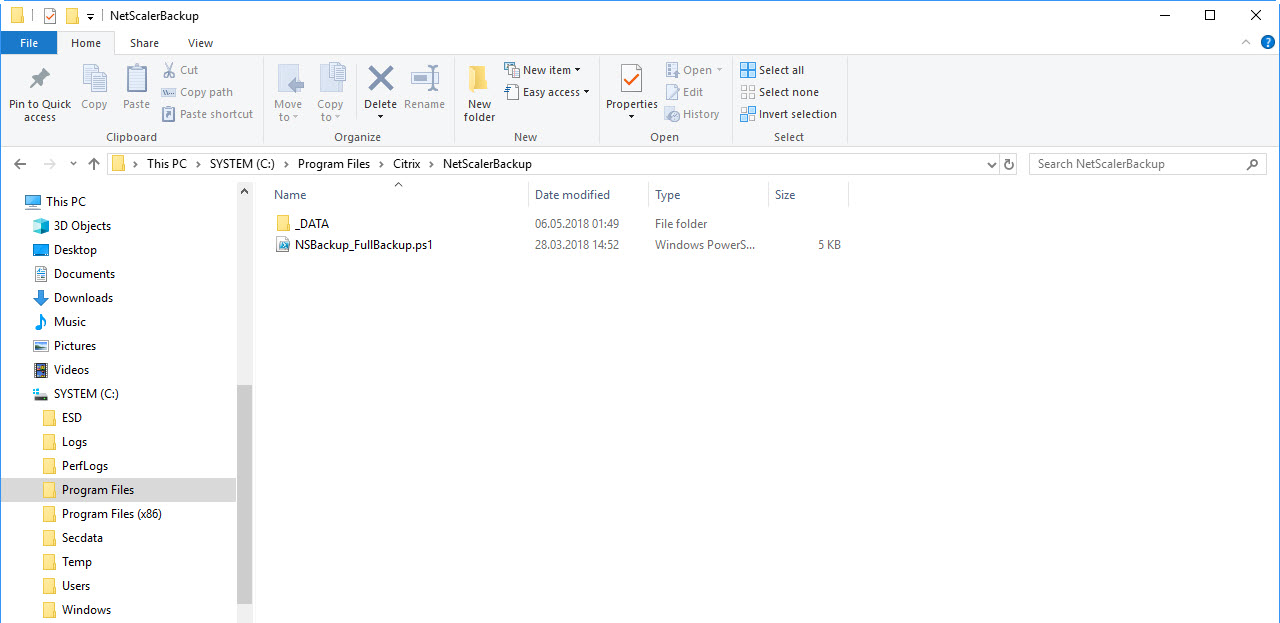
Backup root folder “C:\Program Files\Citrix\NetScalerBackup”. Save the powershell script in this folder, or to the path you like.

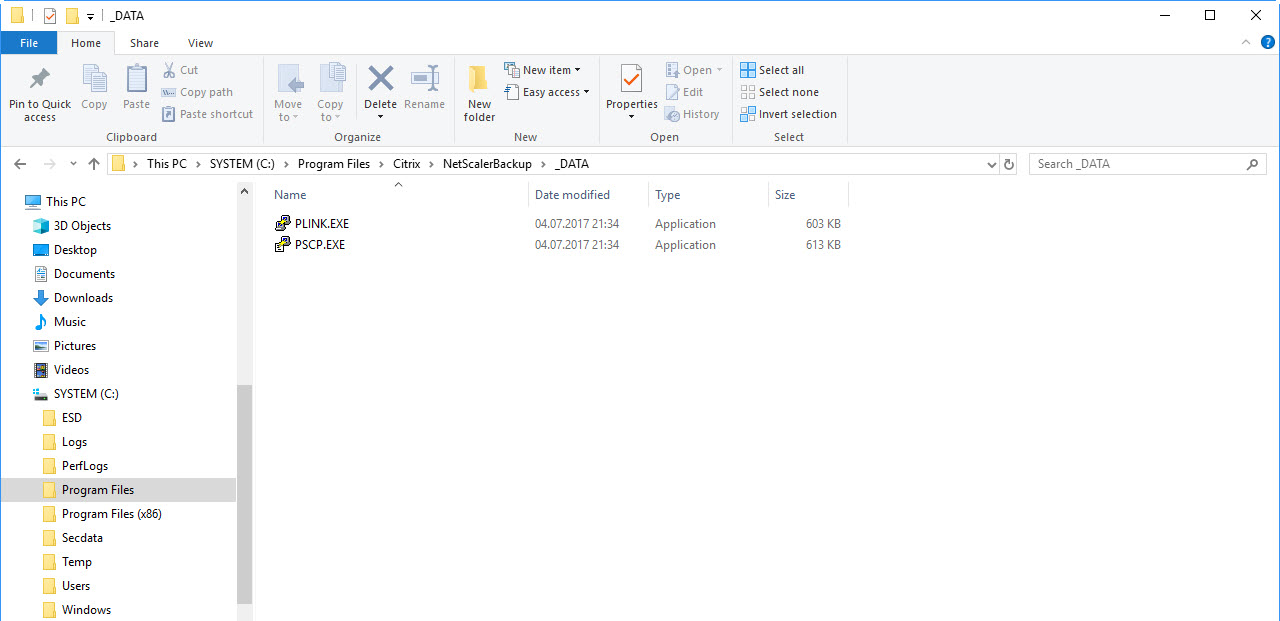
Backup program path “C:\Program Files\Citrix\NetScalerBackup\_DATA” Save the PLINK.exe ans PSCP.exe from the Putty source in this folder.

4 Run the PowerShell script through a scheduled task

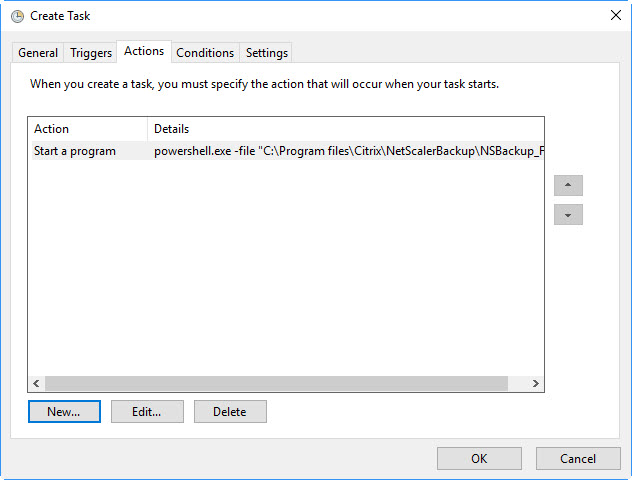
To run the PowerShell script with a scheduled task, create an action with following command line parameters:

powershell.exe -file “C:\Program files\Citrix\NetScalerBackup\NSBackup_FullBackup.ps1” -appliancename nsvpx01.wdho.nt -backupuser ns_backup

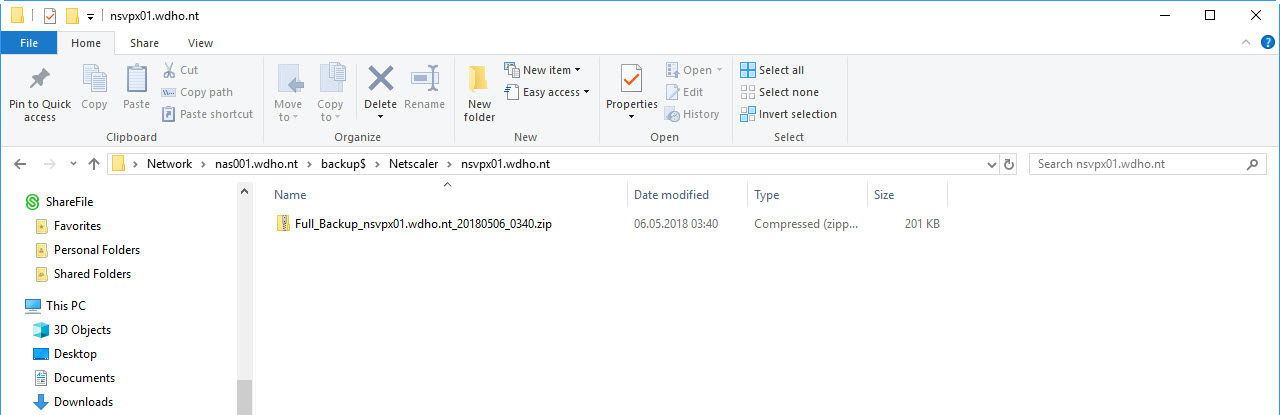
The PowerShell script copy the compressed Full Backup to the destination folder.

The PowerShell script

The script create a full backup of your Citrix Netscaler appliance, compress the backup data and copy the compressed file to a CIFS share, or file location you specified in the PowerShell script.After the backup was created and copied, the PowerShell script delete the backup on the Citrix Netscaler appliance. When you have an HA pair of Citrix Netscaler, the PowerShell script also delete the backup on the HA secondary member (The HA sync service in the primary node, copy the backup to the secondary node).

Lines: 103

1
2
3
4
5
6
7
8
9
10
11
12
13
14
15
16
17
18
19
20
21
22
23
24
25
26
27
28
29
30
31
32
33
34
35
36
37
38
39
40
41
42
43
44
45
46
47
48
49
50
51
52
53
54
55
56
57
58
59
60
61
62
63
64
65
66
67
68
69
70
71
72
73
74
75
76
77
78
79
80
81
82
83
84
85
86
87
88
89
90
91
92
93
94
95
96
97
98
99
100
101
102
103
####################################################################################
#  Title:       FullBackup from Citrix NetScaler Appliance
#  Description: Create FullBackup from Citrix NetScaler Appliance and copy to CIFS
#               Backup Share
#  Version:     2.1/roe
#  Date/Time:   28.03.2018 / 08:03
#  Developer:   Beat Röthlisberger
####################################################################################

#----------------------------------------------
# Collect parameters from start command line
#----------------------------------------------
Param( [Parameter(Mandatory=$True,Position=1)]
[string]$appliancename,
[Parameter(Mandatory=$True)]
[string]$backupuser,
[switch]$force = $false
)

#----------------------------------------------
# Collect date and time
#----------------------------------------------
$actualdatetime = Get-Date -UFormat "%Y%m%d_%H%M"

#**********************************************
# Set variables
#**********************************************
$backuproot = "C:\Program Files\Citrix\NetScalerBackup"
$backupfolder ="\\nas001.wdho.nt\backup$\Netscaler\$appliancename"
$backupname = "Full_Backup_" + $appliancename + "_" + $actualdatetime
#**********************************************

#----------------------------------------------
# Script variables
#----------------------------------------------
$bakupprgpath = "$backuproot\_DATA"
$pscppath = "$bakupprgpath\pscp.exe"
$plinkpath = "$bakupprgpath\plink.exe"
$appliancepath = $appliancename + ':/var/ns_sys_backup'
$baseDATA = "$bakupprgpath\baseDATA.txt"
$readbaseDATA = [IO.File]::ReadAllText($baseDATA)
$decodeDATA = [System.Text.Encoding]::Unicode.GetString([System.Convert]::FromBase64String($ReadBaseDATA))
$zippath = "C:\Program Files\7-Zip\7z.exe"
$backupnametgz = $backupname + '.tgz'
$backupnamezip = "$backupname.zip"

#----------------------------------------------
# Run backup on NetScaler appliance
#----------------------------------------------
&$plinkpath -l $backupuser -pw $decodeDATA -ssh $appliancename create system backup $backupname -level full -comment FullBackup_Script

#----------------------------------------------
# Copy backup file from NetScaler appliance
#----------------------------------------------
&$pscppath -r -scp -l $backupuser -pw $decodeDATA $appliancepath $backuproot\$backupname

#----------------------------------------------
# Compress backup and copy to backup cifs share
#----------------------------------------------
&$zippath a "$backupfolder\$backupnamezip" "$backuproot\$backupname"
Remove-Item "$backuproot\$backupname" -recurse

#----------------------------------------------
# Delete backup on netscaler appliance
#----------------------------------------------
&$plinkpath -l $backupuser -pw $decodeDATA -ssh $appliancename rm system backup $backupnametgz

#----------------------------------------------
# Find secondary HA NetScaler appliance and
# delete synced backup on secondary HA node
#----------------------------------------------
$nshaidsec = &$plinkpath -l $backupuser -pw $decodeDATA -ssh $appliancename "show HA node | grep -E 'ID:' -i | grep -v '0'"
$separator = "Done","2)","Node ID:"
$option = [System.StringSplitOptions]::RemoveEmptyEntries
$nshaidsec2,$nshaidsec1,$nshaidsec = $nshaidsec.Split($separator, $option)
$nshaidsec = $nshaidsec.Trim()
#Write-Host "Secondary Node ID:" $nshaidsec

$nshastatesec = &$plinkpath -l $backupuser -pw $decodeDATA -ssh $appliancename "show HA node $nshaidsec | grep -E 'Master State:' -i"
$separator = "Done","2)","Master State:"
$option = [System.StringSplitOptions]::RemoveEmptyEntries
$nshastatesec2,$nshastatesec1,$nshastatesec = $nshastatesec.Split($separator, $option)
$nshastatesec = $nshastatesec.Trim()
#Write-Host "Secondary HA State:" $nshastatesec

$nsipsec = &$plinkpath -l $backupuser -pw $decodeDATA -ssh $appliancename "show HA node $nshaidsec | grep -E 'IP:' -i"
$separator = "Done","2)","IP:"
$option = [System.StringSplitOptions]::RemoveEmptyEntries
$nsipsec2,$nsipsec1,$nsipsec = $nsipsec.Split($separator, $option)
$nsipsec = $nsipsec.Trim()
#Write-Host "Secondary IP:" $nsipsec

$appliancenamesec = [System.Net.Dns]::GetHostByAddress($nsipsec).Hostname
#Write-Host "Secondary Hostname:" $appliancenamesec

If ($nshastatesec -like 'Secondary'){
#Write-Host "Delete Backup on secondary node..."
&$plinkpath -l $backupuser -pw $decodeDATA -ssh $appliancenamesec rm system backup $backupnametgz
}

#----------------------------------------------
# End
#----------------------------------------------

SCOM – Add additional informations to alert custom fields and notifications from extended class

Summary

You have built extended classes in SCOM and fill the extended classes with data from your own built attributes? Now you want to use this data in custom fields from alerts und notifications?

Here is a method with powershell and SCORCH to add data from extended classes to custom fields in SCOM and use this data for custom notifications and other cool stuff.

Description

The script running in my scenario trough a SCORCH runbook. With small changes, the script will also run without SCORCH on a command channel notification.

First you musst declare some variables and values to understand and use the following powershell script.

  • Alert ID (script line 11) $alertID (In my scenario, the SCORCH runbook run only when a specific alert are come up in SCOM.)
  • SCOM management server (script line 14) $hostname (The hostname in FQDN from any of your SCOM management server)
  • Property name of your extended class (script line 60) $className (The display name of your extended class)
  • Value names from your extended class (script lines 61 – 63) $classAttr1, $classAttr2, $classAttr3 (How you can find the value names of your extended class with powershell, is explained in this post.)

The SCORCH runbook


The SCORCH runbook are pretty easy to create.

 Create a “Monitor Alert” pattern, with following settings.

Set the filter for “Monitor Alert” to the SCOM (Source) attribute “MonitorObjectDisplayName” or something else that you like to filter from the alert.

Create a “Run .Net Script” pattern and paste the powershell script.

Link the string from the variable $alertID to the published data filed “ID” from the pattern “Monitor Alert”.

Add following string data to the “Published Data” section, to pass the values in to the linked runbook pattern.

Create an “Update SCOM Alert” pattern with the following data.

Link the property “Alert ID” to the published data filed “ID” from the pattern “Monitor Alert”.

Add fields to the properties area that you want to fill with the runbook. In my scenario I fill the custom fields 1-3.

Link the selected fields to the passed variables from the “Run .Net Script” pattern.

Link the created patterns and voilà, the runbook are complete.

The powershell script

The script collect the values from your extended class and write the values in the custom fields to the original alert. (How you can find the value names of your extended class with powershell, is explained in this post.)

EventLog entry
The powershell script  create on line 26 an Event Log entry on the SCOM management server, to check whether the runbook was started. When you dont need this, comment it out.

1
2
3
4
5
6
7
8
9
10
11
12
13
14
15
16
17
18
19
20
21
22
23
24
25
26
27
28
29
30
31
32
33
34
35
36
37
38
39
40
41
42
43
44
45
46
47
48
49
50
51
52
53
54
55
56
57
58
59
60
61
62
63
64
65
66
67
68
69
70
71
72
73
74
75
76
77
78
79
80
81
82
83
84
85
86
87
88
89
90
91
92
93
94
####################################################################################
#  Title:       Custom fileds alert update script SCORCH
#  Description: Collect additional informations from extended class and write back
#               to the defined custom fields from original alert
#  Version:     1.3/roe
#  Date/Time:   05.09.2017 / 09:42
#  Developer:   Beat
####################################################################################

#Alert ID SCORCH value
$alertID = "Alert ID or runbook pattern link"

#SCOM MGM server for connection
$hostname = "scommgmsrv.domain.com"

#Declared variables for script
$arguments = "$alertID"
$password = ConvertTo-SecureString "*********" -AsPlainText -Force
$username = "DOMAIN\username"
$credentials = New-Object -TypeName System.Management.Automation.PSCredential -ArgumentList $username, $password
$session = New-PSSession -credential $credentials -ComputerName $hostname
$result = Invoke-Command -Session $session -ScriptBlock {$alertIDInv=$args[0]

#Begin script block "$alertIDInv"
#Write EventLog on SCOM management server "$hostname"
Write-EventLog -EntryType Success -LogName Application -Source SCOMScript -EventId 1000 -Message "Powershell script - SCORCH update custom fields - executed, Alert ID = $alertIDInv"

#Check if the operations manager module is loaded
$checksnap = Get-Module | Where-Object {$_.name -eq "OperationsManager"};
if ($checksnap.name -ne "OperationsManager")
 {
 Import-Module OperationsManager;
 }

#Convert the alert ID and get the alert
$newalert = Get-SCOMAlert -Criteria "Id = '$alertIDInv'";
#Get the alert source server
$server= $newalert.principalname;

#Declare object to pass variable ot of script block "$alertIDInv"
new-object pscustomobject –property @{
 server = $server
 alertIDInv = $alertIDInv
 }
 
#Argument list to pass in to the script block "$serverInv"
} -ArgumentList $arguments
#Close PS session from script block "$alertIDInv"
Remove-PSSession $session

#Declare Variables for script block "$serverInv"
$serverInv = $result.server
$alertIDInv = $result.alertIDInv
$argumentsInv = "$serverInv"
$session = New-PSSession -credential $credentials -ComputerName $hostname
$resultReg = Invoke-Command -Session $session -ScriptBlock {$serverInv=$args[0]

#Begin Script Block "$serverInv"
#***************Begin variables***************
$className = "Windows Computer Extended Attribute"
$classAttr1 = "AttributeDiscoveryGeneratedByUI843f4fa102e24b2791be3ccce9441e92"
$classAttr2 = "AttributeDiscoveryGeneratedByUIc16fe093d54846159a5f620545143277"
$classAttr3 = "ActiveDirectorySite"
#****************End variables****************

$class = Get-SCOMClass | WHERE {$_.Displayname -eq $className}
$SCOMExAttr = Get-SCOMClassInstance -Class $class | WHERE {$_.Displayname -eq "$serverInv"}

$serverFunctionSCOM = $SCOMExAttr.psobject.properties | % {if($_.Name -like "*$classAttr1*"){$_.value.value}}
$serverTypeSCOM = $SCOMExAttr.psobject.properties | % {if($_.Name -like "*$classAttr2*"){$_.value.value}}
$serverOUSiteSCOM = $SCOMExAttr.psobject.properties | % {if($_.Name -like "*$classAttr3"){$_.value.value}}

#Test content of variables
Write-Host $serverFunctionSCOM
Write-Host $serverTypeSCOM
Write-Host $serverOUSiteSCOM

#Declare object to pass variable ot of script block "$serverInv"
new-object pscustomobject –property @{
 ServerFunctionSCOM = $serverFunctionSCOM
 ServerOUSiteSCOM = $serverOUSiteSCOM
 ServerTypeSCOM = $serverTypeSCOM
 }

#Argument list to pass in to the script
} -ArgumentList $argumentsInv
#Close PS Session from script block "$serverInv"
Remove-PSSession $session

#Transform informations for SCOM custom fields variables
$serverFunctionSCOM = $resultReg.ServerFunctionSCOM
$serverOUSiteSCOM = $resultReg.ServerOUSiteSCOM
$serverTypeSCOM = $resultReg.ServerTypeSCOM
$serverDomainSCOM = $resultReg.ServerDomainSCOM

Result

When the triggered alert shows up in SCOM the created runbook will run and add the values in the custom fields.

Important to know: When you have a lot of data in your extended class, the powershell script take a little bit longer then thought. If the values in notifications are needed, configure the delay for sending the notification to 1 minute.

If the runbook has updated the alert, the “Last Modified By” data switch from System to the SCORCH service account.

Now the custom fields are filled up with the values from your extended class.

SCOM – Get values from your own built extended class with powershell

Summary

You want show or use values from your own extended classes in SCOM with powershell?

Yes you can, this is possible with the following powershell commands.

Description

First you must declare your extended class. In my scenario I take the SCOM class “Windows Computer”. The new extended class are named “Windows Computer Extended Attributes”. Now, I filled up the extended class with a lot of data from monitored Windows and Linux computers.  As example; Server function, server type, server team membership and a lot of other important data from registry and WMI. You can now filter, sort and group the monitored objects dynamically in SCOM with the data from the extended class.

Also, you can get the values with powershell and create some other great scripts.

The powershell commands

To get the SCOM class instance (extended class) you must declare first the extended SCOM class.

$Class = Get-SCOMClass | WHERE {$_.Displayname -eq "Windows Computer Extended Attribute"}

Now you can get the SCOM class instance (extended class). The command “Get-SCOMClassInstance” shows a large amount of data. I restrict the result with a monitored object, in this case I take a monitored Windows server. The Displayname must match exactly the Displayname from the monitored object, in my case the FQDN “hostname.domain.com”.

$SCOMExAttr = Get-SCOMClassInstance -Class $Class | WHERE {$_.Displayname -eq "srv11111.domain.com"}

To figure out the value names to be used, you can export the SCOM class instance to a text file or something else.

$SCOMExAttr = Get-SCOMClassInstance -Class $Class | WHERE {$_.Displayname -eq "srv11111.domain.com"} | Format-List * >>C:\temp\srv11111.domain.com.txt

In the exported List, you can find the values that you need. You can see default values from the base class that you extended and the own values (imported attributes).


The following value names are relevant to continue with the powershell script. The value names in your own extended class have for all monitored objects the same UID.

  • Server function:
    [Typec3a7a87fba9948b2bccc46a3ea47fe9e].AttributeDiscoveryGeneratedByUI843f4fa102e24b2791be3ccce9441e92
  • Server type:
    [Type1a1021e9c2c6410dace6e73c3f95cb66].AttributeDiscoveryGeneratedByUIc16fe093d54846159a5f620545143277
  • Active Directory Site:
    [Microsoft.Windows.Computer].ActiveDirectorySite

To get the values use the subsequent powershell command

1
2
3
$SCOMExAttr.psobject.properties | % {if($_.Name -like "*AttributeDiscoveryGeneratedByUI843f4fa102e24b2791be3ccce9441e92*"){$_.value.value}}
$SCOMExAttr.psobject.properties | % {if($_.Name -like "*AttributeDiscoveryGeneratedByUIc16fe093d54846159a5f620545143277*"){$_.value.value}}
$SCOMExAttr.psobject.properties | % {if($_.Name -like "*ActiveDirectorySite"){$_.value.value}}

Result

The script displays the following output. You can use this output to fill the custom fields from SCOM alerts and create some custom notifications.